
🎯 How to Increase Your Chances of Recovering Lost Belongings
Let me be straight with you from the start. There’s no magic trick that guarantees you’ll get a lost item back. Anyone who tells you otherwise is overselling it.
But here’s what I do know — and what I’ve seen play out over and over again — the difference between people who recover lost items and people who don’t almost always comes down to the same few things. How fast they acted. How smart they searched. And whether they used the right channels.
I’ve helped three friends recover lost items in the past two years alone. A laptop left at a coffee shop in Toronto. A passport forgotten at a hotel in Bangkok. A wallet dropped somewhere between a train station and a restaurant in Edinburgh. All three came back. None of them should have — statistically speaking. But they did because the right steps were followed at the right time.
This is what those steps look like.
⚡ Rule Number One — The First Hour Matters Most
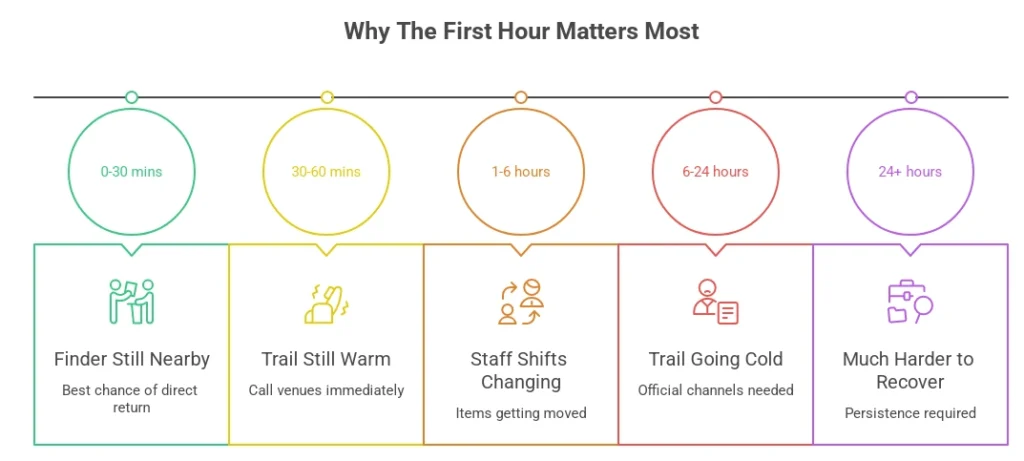
I cannot stress this enough. The first hour after losing something is worth more than everything that comes after it combined.
Here’s why. Lost items have a window. In that first hour, the person who found your phone is still nearby. The taxi driver who has your wallet hasn’t started another shift yet. The restaurant where you left your keys hasn’t had three more tables of customers sit down in your spot. The trail is warm.
After 24 hours, things change. Items get moved. Staff change shifts. Drivers hand things in and move on. The finder who wanted to return your item gives up trying to find you and hands it to an authority — or worse, gives up entirely.
So whatever you do — do it fast. The moment you notice something is missing, start moving.
🧠 Step 1 — Retrace Mentally Before You Retrace Physically
Most people do this backwards. They rush back to the last place they visited without actually thinking about where the item is most likely to be. That wastes time.
Before you go anywhere, sit down for two minutes and think. When did you last definitely have the item? Not where you think you might have had it — where do you know for certain it was with you?
Work backwards from that moment. Every place you went after that point is a potential location. Rank them in order of likelihood and start with the most probable one.
This sounds obvious but in a panic most people skip this step entirely and end up searching in the wrong order.
📞 Step 2 — Call, Don't Visit
Unless you’re still nearby, call first. Physically going back to every place you visited takes hours. Calling takes minutes.
Call each place in your priority order. Be specific when you speak to someone — give your name, describe the item in detail, say exactly when you were there and where you were sitting or standing. Ask them to physically go and check right now while you’re on the phone rather than saying they’ll call you back. Most people won’t call back.
If the first person you speak to says they don’t have it, ask to speak to a manager or supervisor. Front desk staff don’t always know what’s been handed in. Housekeepers, security staff, and managers often have better visibility of found items.
🌐 Step 3 — Post on ReportLostnFound.com Immediately
This is the step that most people either don’t know about or leave until it’s too late. Post your lost item report on ReportLostnFound.com as soon as possible — ideally within the first hour.
Go to the Report Lost Item form and fill in everything you can. The item description, the location, the time, any photos you have of a similar item, any identifying features — a sticker, a crack, a distinctive case, initials marked on it.
Here’s the thing about honest finders — and there are more of them than you’d think — they often search online before they do anything official. They pick something up, they want to return it, but they don’t know whose it is or where to hand it in. A report on ReportLostnFound.com gives them a direct path to you.
The platform works globally. Whether you lost something in New York, London, Toronto, Singapore, Dubai, or Sydney — post your report. It’s free and it takes five minutes.
📸 Step 4 — Use Photos Strategically
A detailed description is good. A photo is better. A photo with specific identifying details highlighted is best.
When you post your lost item report, include:
- A photo of the exact item if you have one saved somewhere
- If not, find a photo of the same model or type online and note clearly what makes yours different
- Any unique marks — scratches, stickers, engravings, repair marks, custom cases
- The colour as specifically as possible — not just “blue” but “navy blue with a small silver logo on the front”
Honest finders use these details to confirm they have the right item before reaching out. The more specific you are, the more confident they’ll be that contacting you is worth it.
🤝 Step 5 — Tell Everyone Who Was With You
This sounds simple but people forget it. If you were with friends, colleagues, or family when you lost the item — tell them immediately and ask them to keep their eyes open.
They might remember seeing the item somewhere you’ve forgotten. They might have contacts at the venue you visited. They might pass by the area again before you do.
Also tell people on social media if the item was lost in a specific public location. A post saying “I left my black North Face backpack at Waterloo Station this morning — if anyone finds it please message me” costs nothing and reaches people who were in that exact place at that exact time. It works more often than most people expect.
🏛️ Step 6 — Report to Official Authorities
For valuable items — passports, wallets, phones, laptops, official documents — report to the relevant official authority for where you lost it.
This serves two purposes. First, if an honest finder hands the item in officially, there’s now a record connecting it to you. Second, if the item was stolen rather than lost, you have documentation for insurance purposes.
In the UK, items found on public transport go to the Transport for London Lost Property Office. In the US, the TSA handles items left at airport security checkpoints. For general lost property in most countries, the local police station is the right first port of call.
File a report even if you’re not sure it will help. It creates a paper trail and costs you nothing.
✅ Complete Recovery Checklist
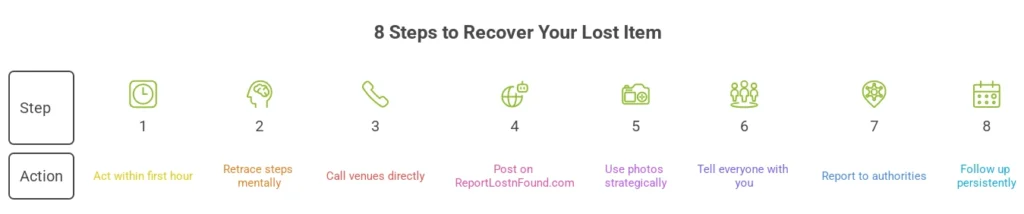
- ✅ Act within the first hour — speed is everything
- ✅ Retrace mentally before physically
- ✅ Call every location in priority order
- ✅ Post on <a href=”https://reportlostnfound.com/report-lost-item/”>ReportLostnFound.com</a> immediately
- ✅ Include detailed photos and identifying features
- ✅ Tell everyone who was with you
- ✅ Post on social media for location-specific losses
- ✅ Report to official authorities
- ✅ Follow up every 24-48 hours
- ✅ Set up tracking and labelling for future items
📊 What Actually Increases Your Recovery Chances
Here’s an honest breakdown based on what actually works:
Action Impact on Recovery Acting within first hour Very High ✅ Posting on ReportLostnFound.com High ✅ Calling venues directly High ✅ Including photos in report Medium-High ✅ Reporting to authorities Medium ✅ Social media posts Medium ✅ Following up persistently High ✅ Waiting and hoping Very Low ❌
✅ Final Thought
The honest truth is that luck plays a role. Some items are found by people who want to return them. Some aren’t. That part is out of your control.
What is in your control is how fast you move, how smart you search, and how many channels you use. People who do all three recover items that by rights should have been gone forever.
Start with ReportLostnFound.com — post your report right now if you haven’t already. Then work through the rest of this list. Give yourself every possible chance.